Installing suPHP on CentOS With Virtualmin/Webmin
What is suPHP?
Installing suPHP
Login to your root server using SSH
Enter the following command
If you get an error that the package doesn’t exist, you have to install RPMforge repository.
If you don’t know what’s your server architecture (32 bit or 64 bit), you can find out using the following command:
For CentOS 6 64 bit:
For CentOS 6 32 bit:
For CentOS 5 64 bit:
For CentOS 5 32 bit:
Now install mod_suphp again:
Configuring suPHP
After installing suPHP, you will have two new configuration files:
/etc/suphp.conf – This is the configuration file for suPHP
/etc/httpd/conf.d/suphp.conf – This is the configuration file for the suPHP and Apache module
Edit the suPHP configuration file first:
Make sure that the value of webserver_user=apache
Change the value x-httpd-php=php:/usr/bin/php to:
Change the value x-suphp-cgi=execute:!self to:
That’s how your /etc/suphp.conf should look like (You can just copy/paste it if you want):
[global]
logfile=/var/log/httpd/suphp_log
loglevel=info
webserver_user=apache
docroot=/
env_path=/bin:/usr/bin
umask=0022
min_uid=500
min_gid=500
; Security options
allow_file_group_writeable=true
allow_file_others_writeable=false
allow_directory_group_writeable=true
allow_directory_others_writeable=false
;Check wheter script is within DOCUMENT_ROOT
check_vhost_docroot=true
;Send minor error messages to browser
errors_to_browser=false
[handlers]
;Handler for php-scripts
x-httpd-php=”php:/usr/bin/php-cgi”
;Handler for CGI-scripts
x-suphp-cgi=”execute:!self”
Edit /etc/httpd/conf.d/suphp.conf
Delete everything inside the /etc/httpd/conf.d/suphp.conf (or comment them), except the following line:
We do this to disable suPHP globally, specially if you have more than one virtual host and more than one user, and we enable suPHP below on the virtual hosts in order to run the php scripts as their owner user.
Editing httpd.conf
Go to your Webmin tab => Servers => Apache Webservers => Global Configuration => Edit Config File
Make sure the /etc/httpd/conf/httpd.conf is selected,
Find all the <virtualHost> directives and add the following inside everyone:
suPHP_UserGroup userName groupName
AddHandler x-httpd-php .php .php3 .php4 .php5
suPHP_AddHandler x-httpd-php
Replace userName and groupName by your linux user and group respectively.
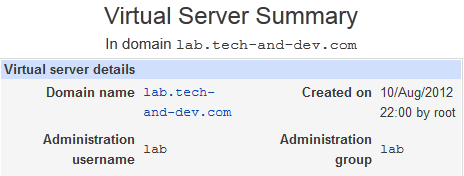
If you don’t know what’s your userName and groupName are, go to VirtualMin tab, choose the virtual server you’re editing and you will see the user and group name, in my case, it’s “lab” and “lab”
My modified Virtual Host look like the following:
SuexecUserGroup “#507” “#506”
ServerName lab.tech-and-dev.com
ServerAlias www.lab.tech-and-dev.com
DocumentRoot /home/lab/public_html
ScriptAlias /cgi-bin/ /home/lab/cgi-bin/
suPHP_Engine on
suPHP_UserGroup lab lab
AddHandler x-httpd-php .php .php3 .php4 .php5
suPHP_AddHandler x-httpd-php
If you were using FastCgi (FCGI), you will have to remove (or comment) the following lines
AddHandler fcgid-script .php5
FCGIWrapper /home/example/fcgi-bin/php5.fcgi .php
FCGIWrapper /home/example/fcgi-bin/php5.fcgi .php5
Editing Virtual Hosts default Template
One last thing is we have to add suPHP as the default php handler for the new virtual hosts.
- Go to Virtualmin tab
- Click System Settings
- Click Server Templates
- Choose your template (or click on Default Settings if you haven’t created a template)
- On top, next to “Edit template section”, choose “Apache Website“
- Below the DocumentRoot ${HOME}/public_html, add the following:
-
suPHP_Engine on
suPHP_UserGroup ${USER} ${GROUP}
AddHandler x-httpd-php .php .php3 .php4 .php5
suPHP_AddHandler x-httpd-php - So overall it will look like this:
-
ServerName ${DOM}
ServerAlias www.${DOM}
DocumentRoot ${HOME}/public_html
suPHP_Engine on
suPHP_UserGroup ${USER} ${GROUP}
AddHandler x-httpd-php .php .php3 .php4 .php5
suPHP_AddHandler x-httpd-php
ErrorLog /var/log/virtualmin/${DOM}_error_log
CustomLog /var/log/virtualmin/${DOM}_access_log combined - Scroll down and change Default PHP execution mode to Apache mod_php (run as Apache’s user)
Restart Apache
Try to access your website now.
Problems and Solutions
If you get a 500 error, make sure your directories and files permissions are correct. Directories should have permission 755 and files should have permission 644.
Any questions? Please leave your comment below!


Invalid command 'suPHP_UserGroup', perhaps misspelled or defined by a module not included in the server configuration