Installing VNC Server on CentOS

What is VNC?
Requirements for this Tutorial:
- Linux CentOS Server
- Windows Client.
- In this tutorial I will connect from my windows operating system to my linux server using VNC.
- To be able to successfully install and run VNC you need to have root access to your server.
- In this tutorial I’m assuming you are using CentOS operating system. Although installing it on a different Linux operating should be very similar.
Installing VNC Server on CentOS
First we need to install X Window System (X11) which is a software system and network protocol that provides a basis for graphical user interfaces.
yum groupinstall “X Window System”
For CentOS 5, run the following command:
yum groupinstall “GNOME Desktop Environment”
For CentOS 6, run the following command:
yum groupinstall desktop
Now let’s install the VNC Server:
For CentOS 5
yum install vnc-server
For CentOS 6
yum install tigervnc-server
yum install xorg-x11-fonts-Type1
or
yum groupinstall fonts
Configuring VNC Server for root access:
To login to the remote server as root:
Edit the /etc/sysconfig/vncservers file:
vi /etc/sysconfig/vncservers
Uncomment the following two lines and remove -nolisten tcp -localhost:
# VNCSERVERS=”2:myusername”
# VNCSERVERARGS[2]=”-geometry 800×600 -nolisten tcp -localhost”
VNCSERVERS=”2:root”
VNCSERVERARGS[2]=”-geometry 800×600″
Save (:w) and quit editing the file (:q)
vncpasswd
Start the VNC Server:
service vncserver start
After starting the server, a new file will be created /root/.vnc/xstartup
If you are using CentOS 5, edit /root/.vnc/xstartup (You can skip this in CentOS 6):
vi /root/.vnc/xstartup
And comment twm & and append gnome-session & as follow:
#twm &
gnome-session &
Save (:w) and quit editing the file (:q)
Restart the VNC Server:
service vncserver restart
Configuring VNC Server for root access and another user:
Make sure you are logged in to the server as root:
su –
useradd userone
passwd userone
Edit the /etc/sysconfig/vncservers file:
vi /etc/sysconfig/vncservers
Uncomment the following two lines and remove -nolisten tcp -localhost:
# VNCSERVERS=”2:myusername”
# VNCSERVERARGS[2]=”-geometry 800×600 -nolisten tcp -localhost”
VNCSERVERS=”1:root”
VNCSERVERARGS[1]=”-geometry 640×480″
VNCSERVERS=”1:root 2:userone”
VNCSERVERARGS[1]=”-geometry 640×480″
VNCSERVERARGS[2]=”-geometry 800×600″
Save (:w) and quit editing the file (:q)
su –
vncpasswdsu userone
vncpasswd
Login back as root and start (or restart) the VNC Server:
su –
service vncserver start
After starting the server, a new file for each user will be created:
root will have the following file created: /root/.vnc/xstartup
userone will have the following file created: /home/userone/.vnc/xstartup
If you are using CentOS 5, edit /root/.vnc/xstartup (You can skip this in CentOS 6):
vi /root/.vnc/xstartup
And comment twm & and append gnome-session & as follow:
#twm &
gnome-session &
Save (:w) and quit editing the file (:q)
Do the same for userone: (You can skip this in CentOS 6):
su userone
cd
vi .vnc/xstartup
And comment twm & and append gnome-session & as follow:
#twm &
gnome-session &
Save (:w) and quit editing the file (:q)
Login back to root and Restart the VNC Server:
su –
service vncserver restart
Congratulations, your VNC server should be up and running, check the “Installing VNC Client” below to login and test your connection.
Installing VNC Client
To connect to your server remotely, you need to download install VNC Viewer.
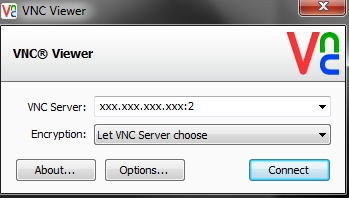
Open VNC Viewer and enter your server’s ip or hostname and the port number, for example:

Enter the password that you have created with vncpasswd, and connect.
You will see your server’s desktop, such as:

Notes:
service NetworkManager stop
chkconfig NetworkManager off
If you want to use a web browser to browse the internet, you can install firefox using the following command:
yum install firefox