What is Varnish
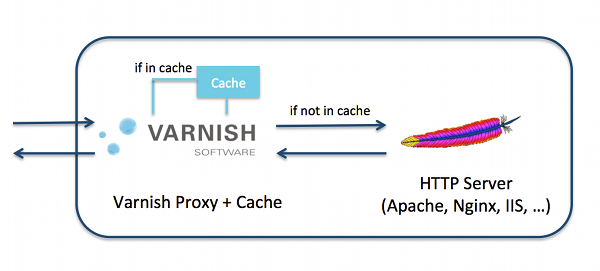
Varnish is an HTTP accelerator and a reverse proxy caching web application.
Varnish is usually installed in front of the webserver such as Apache and Nginx, and cache their content in order to deliver it fast when a request is made.
I couldn’t find any good tutorial on installing varnish with virtualmin so I decided to test and post about it.
Installing dependencies
yum install -y gcc make automake autoconf libtool ncurses-devel libxslt groff pcre-devel libedit libedit-devel
Varnish 4 requires jemalloc to work
rpm -Uvh https://dl.fedoraproject.org/pub/epel/7/x86_64/j/jemalloc-3.6.0-1.el7.x86_64.rpm
Installing Varnish
The below is for CentOS 6. Varnish for other distros can be found on http://repo.varnish-cache.org/
Login to SSH, and issue the following commands:
rpm -Uvh http://repo.varnish-cache.org/redhat/varnish-4.0/el6/noarch/varnish-release/varnish-release-4.0-4.el6.noarch.rpm
yum install varnish
Configuring varnish
Varnish is installed in front of the webserver, so it should listen on port 80 to accept the web requests.
vi /etc/sysconfig/varnish
Set VARNISH_LISTEN_PORT to 80
Since varnish will be listening on port 80, the webserver will have to listen on a different port. In this tutorial, I will use port 8080.
So varnish will fetch the content from the webserver, and cache it. In order for varnish to know which port the webserver is listening to, we modify /etc/varnish/default.vcl
vi /etc/varnish/default.vcl
And set the port to 8080. Then set the IP to your server’s external IP. Setting it to 127.0.0.1 will not work on virtualmin by default, since virtualmin uses the external IP when creating a virtual host.
(Replace xxx.xxx.xxx.xxx by your external IP)
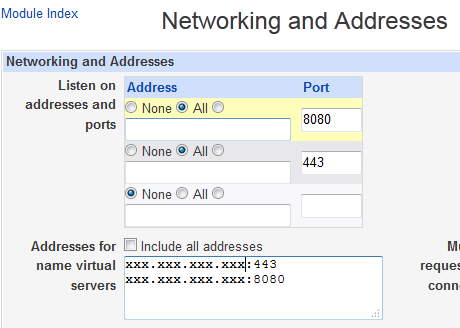
Changing Virtualhosts to new Web server port (8080)
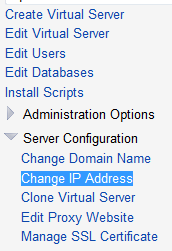
If you already have virtualhosts created, you will have to modify them all, one by one, by going to:
Virtual Server => Server Configuration => Change IP Address => Set New HTTP port to 8080
Change the port the webserver is listening to:
Webmin => Servers => Apache Webserver => Make sure all the virtual hosts are not listening on port 80
Go to Global Configuration Tab => Network and Configuration => Remove ALL the entries that has port 80 in it.
Make sure xxx.xxx.xxx.xxx is your IP Address
Restart the Servers:
service httpd restart
service varnish restart
All your sites should now be running.
Configure Varnish to Start after a Reboot
Go to Webmin => System => Bootup and Shutdown => Choose Varnish => Click Start on Boot
Edit Server Templates
Edit the Server templates, so that the next time you create a new virtual host, it will be listening on port 80.
Virtualmin => System Settings => Server Templates => Default Settings => Apache Website => Change “Port number for virtual hosts” to 8080 and then click “Save”.
If you have more custom templates, you will need to edit them all.
Check Varnish Performance
In SSH type:
varnishstat
In this tutorial, I’m using Apache as a webserver, but it should work well on Nginx or any other webserver.
Any questions? Please let me know!


