Installing VNC Server on CentOS 7
Installing The VNC Server:
Install the CentOS desktop
yum groupinstall "GNOME Desktop"
yum install -y tigervnc-server
useradd vncuser
passwd vncuser
cp /usr/lib/systemd/system/[email protected] /etc/systemd/system/vncserver@:4.service
Edit the service file
vi /etc/systemd/system/vncserver@:4.service
ExecStart=/sbin/runuser -l vncuser -c "/usr/bin/vncserver %i -geometry 1280x800 -nolisten tcp"
PIDFile=/home/vncuser/.vnc/%H%i.pid
Reload systemd (system daemons) to scan for new or changed service file(s).
Enable the service:
systemctl enable vncserver@:4.service
Create the configuration files for the VNC user and set a password when asked:
su vncuser
vncserver
exit
Start the VNC server:
systemctl start vncserver@:4.service
Configure centOS 7 firewall
firewall-cmd --permanent --zone=public --add-service vnc-server
firewall-cmd --reload
Connecting to VNC Remote Server From Windows using Putty:
Download and install VNC client from here
By default, VNC doesn’t provide a free way to connect over an encrypted connection.
We will use PuTTY to tunnel the connection from our computer to the server:
Download PuTTY from here if you don’t have it.
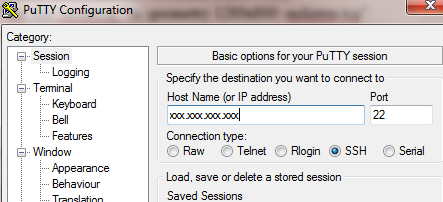
Enter the IP address of your server in the Host Name. Make sure to replace xxx.xxx.xxx.xxx by your server’s IP addres.
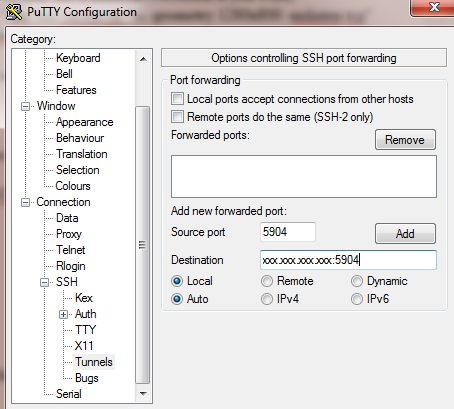
Go to Connection => SSH => Tunnels, enter the source port number (5904 in this example) and enter the IP of the server and the VNC port (IP:PORT (xxx.xxx.xxx.xxx:5904 in this example).
Make sure to replace xxx.xxx.xxx.xxx by your server’s IP address
Click Open and login to your server.
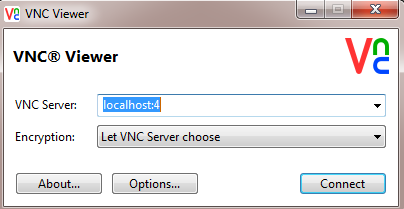
Open VNC client and connect to localhost with the port number you specified in PuTTY.
Congratulations, you should be able to see your remote desktop!
If you are using Linux, you can install Remmina and the remmina-plugin-vnc and connect to the vnc server.
Questions or Comments? Please leave them below!


